Maximize Profits with Search Arbitrage on Autopilot: Guide to 37%+ Returns

Search arbitrage on autopilot is the focus of my latest venture, following the insights shared in my previous guide on What is Native to Search Arbitrage and How Does it Work. I decided to put theory into practice by running a case study campaign using native ads in this domain.
In order to make this case study/guide more comprehensive, I will break this down into 4 main topics. This way, even those who are not familiar with this kind of campaigns can understand and replicate the logic.
- Finding potential good performing feeds/verticals
- Building a solid tracking setup
- Launching and optimizing the campaign
- Results and Key Takeaways
Let’s start!
Finding Potential Good Performing Search Feed Verticals
As always, competitive intelligence tools are extremely useful to find good offers/feeds, as well as getting the right ideas about what images and headlines to use. So before launching this campaign I went to Adplexity Native and ran a query with the following criteria.
Search Query: In Ad Info (enter keyword) | Results of at least 5 to 30/45 days | Country: US | Sort by: “Running longest” & “Received Most traffic”.
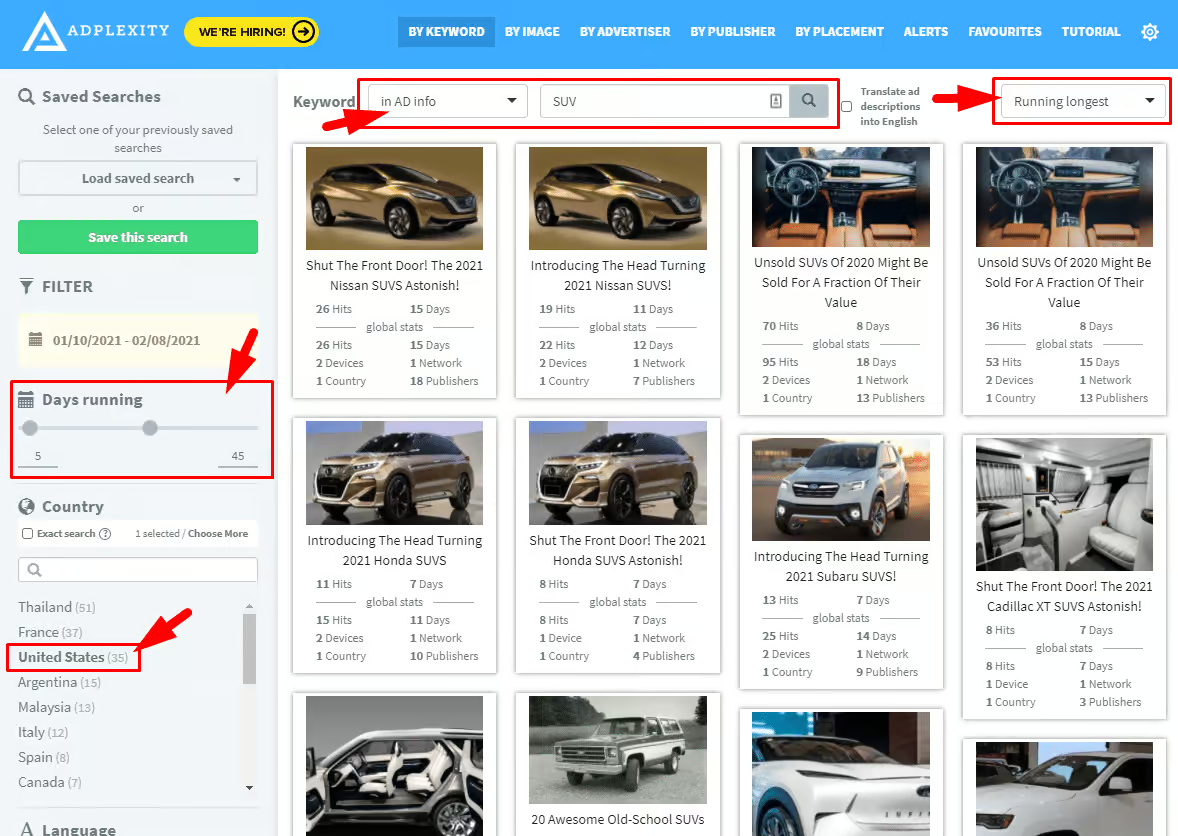
The logic of searching for results based on the ad keywords stands behind the fact that in most cases the keyword or vertical of the feed is present right in the ad headline. So, to get a clear idea of the potential feeds you can promote, check first with your search feed provider account manager for a list of the top-performing feeds, the see what looks more interesting for you.
Knowing that I was going to promote a 2-Click flow Google search feed, I went over an extra step in order to make sure that the search volumes and competition were high enough to scale the campaign. Signed into my Google Ads account, headed to Tools > Keyword Planner and after selecting the country (US), I added a few commonly used search terms related to SUVs.
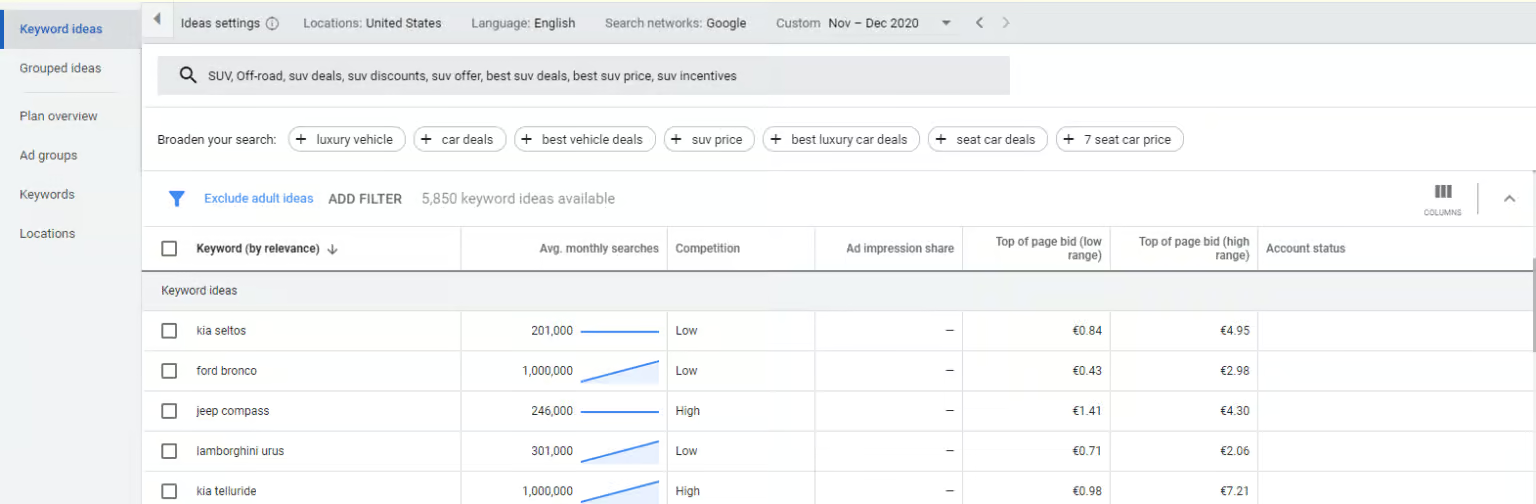
What I was most interested to see in this report was the Avg. Monthly Searches, Top of Page lower and higher Bid.
Having decided with what search feed to go, it was time to consolidate the tracking. The part which I consider to be pretty important because with this type of campaigns we have a pretty high delay when it comes to conversion revenue confirmation – ranging from 24-36-48 hours (see this post for additional details).
Building a Solid Tracking Setup
Considering that most search feed providers nowadays are capable of reporting an estimated revenue for the conversions in near-real-time (this varies from every few minutes up to every hour depending on the provider), I wanted to use this estimated reporting to my advantage. Instead of just placing the destination feed link directly on the ad destination (like most people do), I passed all the traffic through a tracker (in this case Voluum). And here’s why this was a pretty important step for me:
- Both the ad network (Outbrain) and the Search feed provider had over an hour of delay in reporting the performance on their dashboards.
- Using a click tracker, I could see what was converting or not in almost real-time and at the same time use this information for optimization proposes.
- In case I can find a similar feed on another provider, I can easily split-test two or more providers, or even replace the main offer without having to touch the ad destination link causing any delays from the re-approval process.
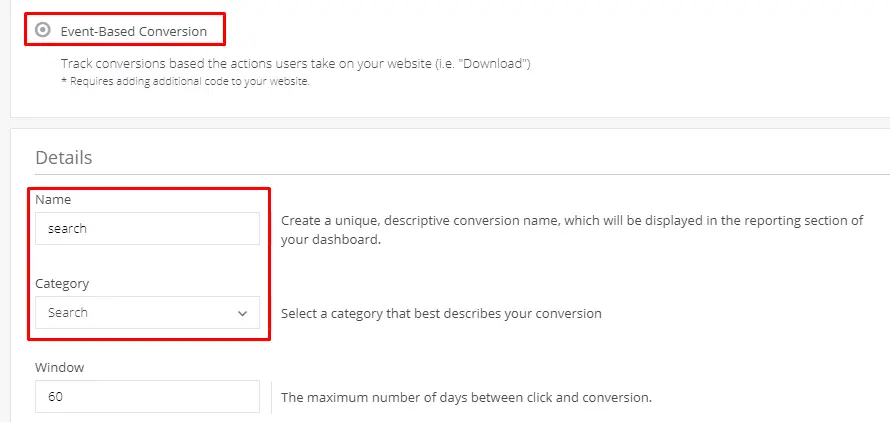
Outbrain configuration:
On Outbrain I created an event-based conversion called “search” assigned to the search category found under Outbrain’s predefined categories
Voluum configuration:
On Voluum I created a separate Outbrain configuration specific for this type of campaign, this way this would not mess up with the other conversion events or send inaccurate info to Outbrain. As you may already know, their tracking pixel tends to be quite unreliable and underreport conversions.
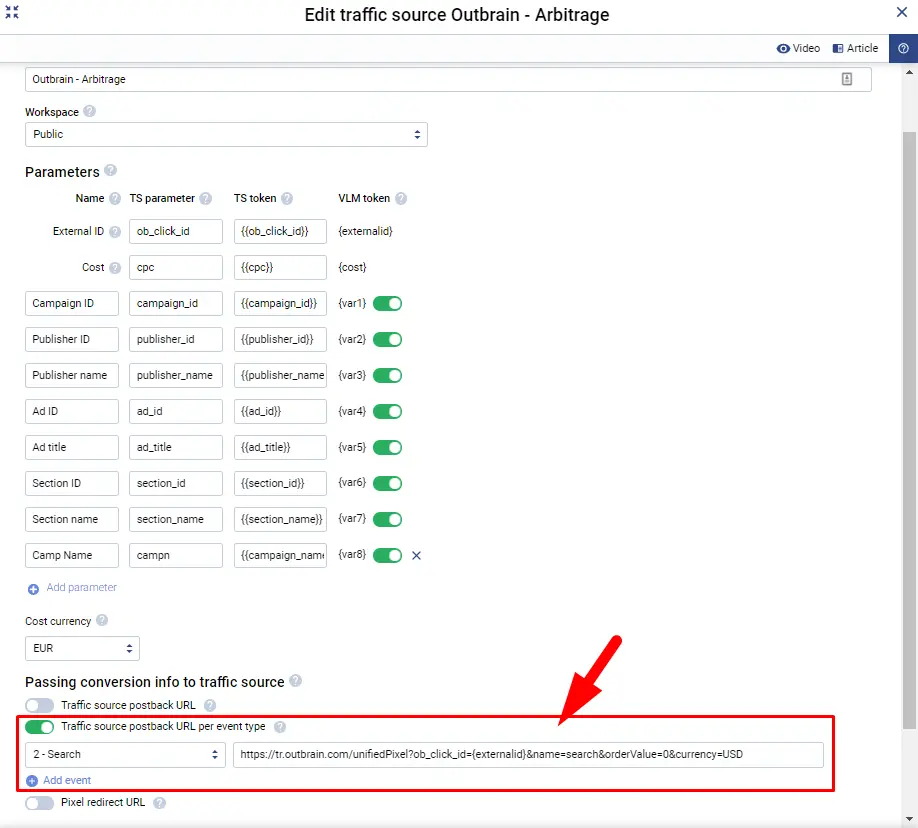
Also, as you can see from the above screenshot, instead of using a standard postback URL for this traffic source config, I used an event-based postback. This way having an event-based postback setup on the search feed provider side, these events can fire smoothly to Voluum, then from this last one to Outbrain. This way when I get the confirmed revenue for the conversions, I can effortlessly upload them as main conversions without risking inflating the conversions count on Outbrain.
Inflated conversions should definitely influence how the traffic source algorithm behaves – never had the courage to test it on something that was working or showed promising results.
Launching and Optimizing the Campaign(s)
At first, I started this campaign with manual optimization in mind, somehow as a challenge for myself, but soon turned out not to be the best choice. This is because the campaign was targeting the US and I am based in the EU, so monitoring and optimizing it manually would have been “mission impossible” for me. Especially with my current daily schedule where 36 hours a day are not enough.
Anyway, I went ahead and created the campaign on Outbrain as follows.
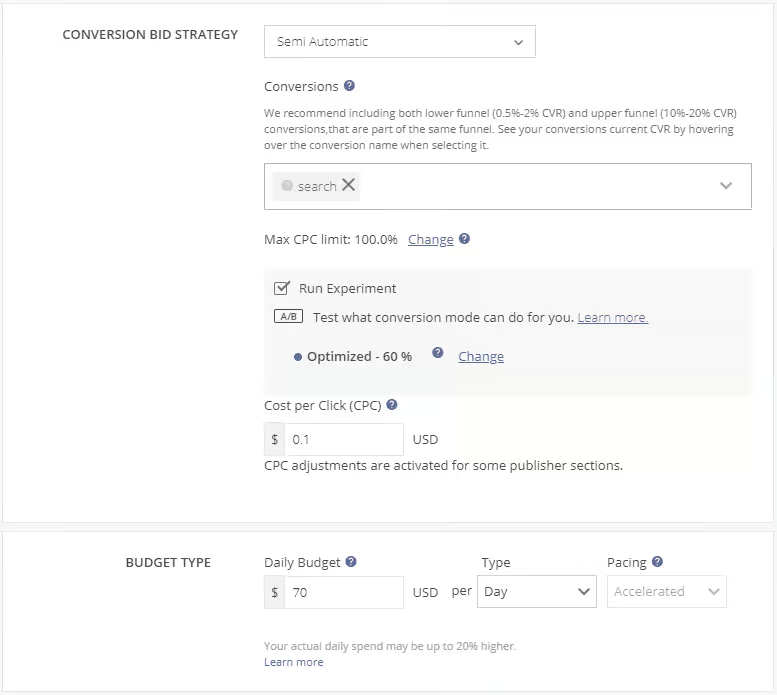
Targeting: United States; Desktop Only; Day parting enabled
Bid: Starting at $0.06 CPC
Budget: $20/day (1st day)*, then slowly increase | Pacing: Accelerated
Conversion strategy: Semi-Automatic [60% Optimized] / Optimize for Conversion – Search
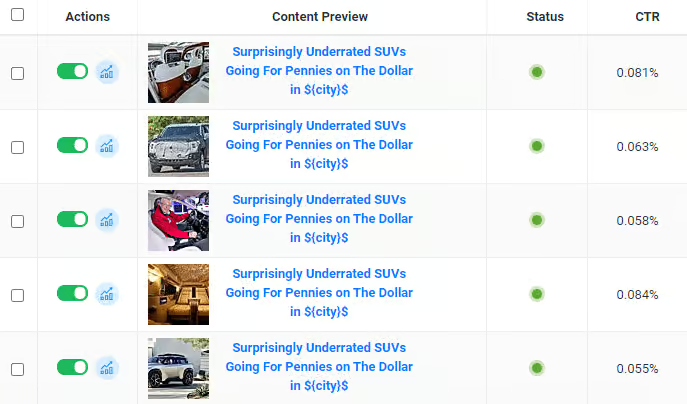
Creatives (ads) used in this case study
Important Note: As you may see from above, I allocated only $20/day for the first day on propose. Knowing that Outbrain wouldn’t give me a chance to block the usual high volume / low competition publishers or sections for the first couple of hours, it was better to just burn that $20 and call it a start after that.
Once the first amount of allocated budget was consumed and I was able to start blocking any of the pubs I didn’t want to get traffic from, I let the campaign consume its daily budget for the first three days while blocking any poor performer daily.
At this point, the campaign was doing around -60% and was showing promising results. But because I was targeting the US, I wasn’t able to follow through, so I connected both Outbrain and Voluum to TheOptimizer Native in order to give the campaign a spin. As the saying goes, work smarter not harder.
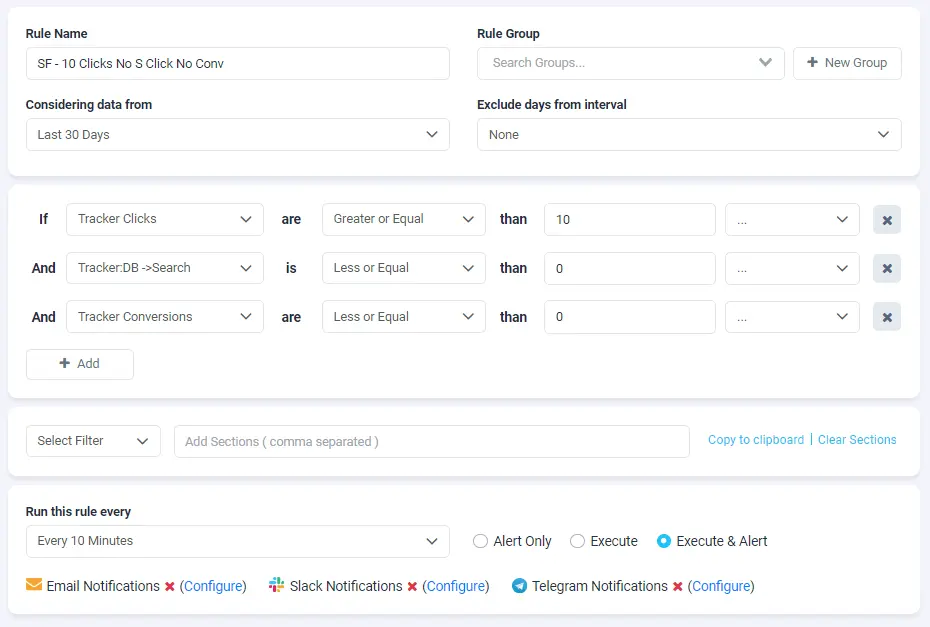
The initial optimization rules were pretty basic. Practically I was excluding any section that had generated 10 clicks and no conversions. This may sound a bit too aggressive, but based on the feedback I received from the account manager, I had to reach at least a 15% conversion rate to make this workout.
Over the time span of over a week, I had collected enough data to start creating some more “intelligent” auto-optimization rules.
Instead of creating generic auto-optimization rules, I went ahead and spent some time looking at my campaign stats, or to be more precise, looking for specific patterns. This way I would be more confident with my optimization approach since this way my optimization would be driven by the data I had collected instead of just throwing rules that could negatively impact my results.
From this moment on, the campaign was virtually running on auto-pilot.
All I had to do was manually download revenue-generating click IDs from the provider in a CSV format, and then upload them on Voluum. Also, the stats of the confirmed revenue were scheduled to be automatically updated on TheOptimizer side using Automatic Updates.

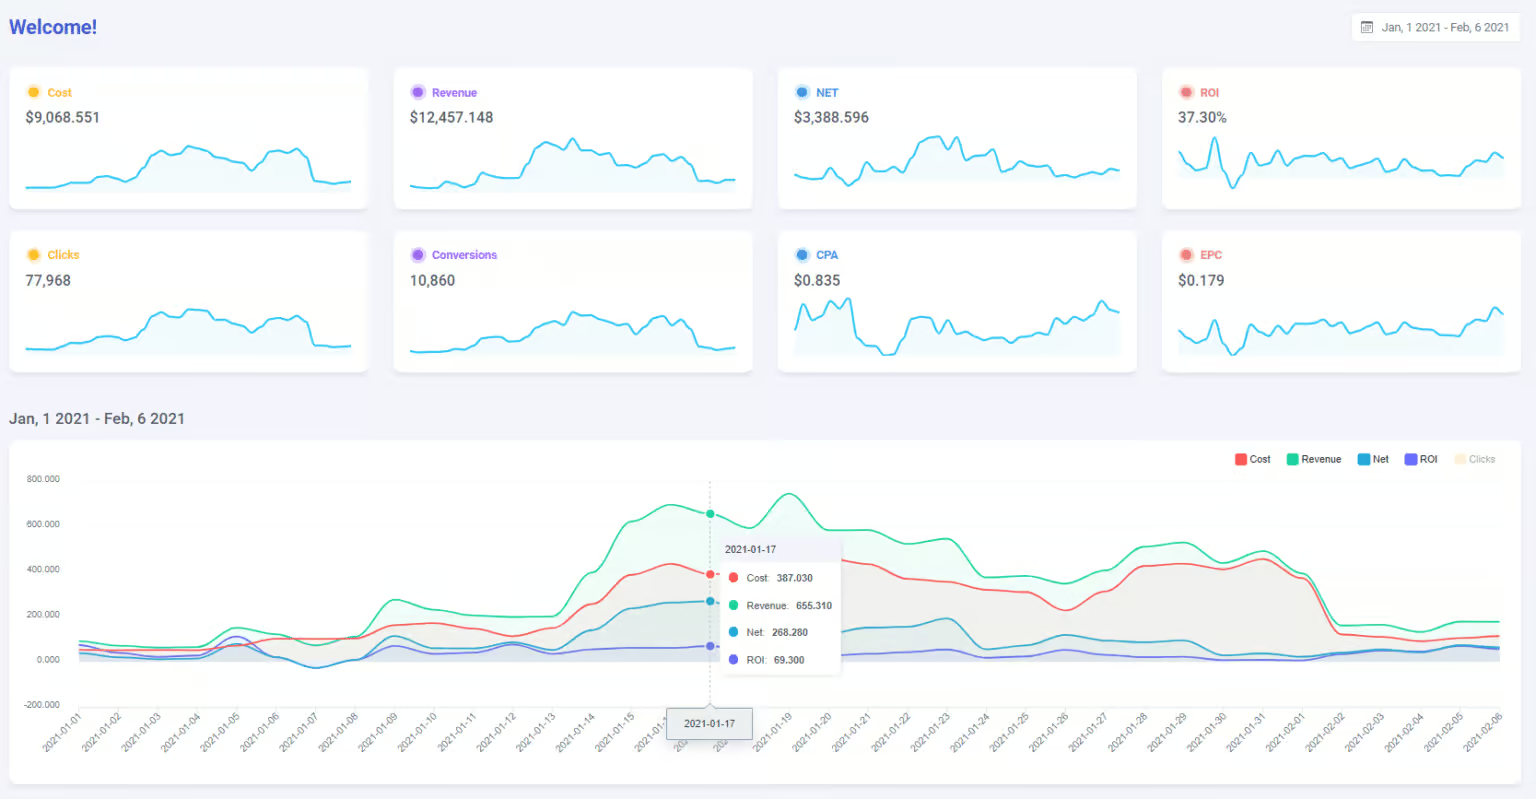
Campaign Results and Key Takeaways
As you can see from the below graph, the results of this campaign were pretty satisfying.
Key Takeaways:
- One doesn’t necessarily need to have a high payout offer in order to generate profits on Native – you can generate profits even with a payout ranging from $0.3 to $1.5 a conversion.
- Always invest time and effort in building a good relationship with your reps. I must say that the account manager played an important role in the success of this campaign. Don’t skip this.
- Focus on understanding the traffic source behavior as much as you can, especially when it comes to how it reacts when playing with bids and budgets.
- The best and proven way to properly optimize a campaign is to rely on the campaign’s data. Data-driven decisions tend to be more reliable in the long run – Don’t learn this the hard way!
- Also, it’s best to adopt your optimization strategy based on the country / vertical and device targeting. Although this applies to all campaign types, for these ones, I think this is a must.
- Use a click tracker whenever possible. Even for experienced media buyers running arbitrage (especially native to search), a tracker will give additional insights you cannot get elsewhere.
- Native to Search Arb Specific – It is really important to be able to exclude at least the current and previous day results when working with ROI-based rules. Things can change a lot in 24 hours, so it’s worth the wait.
- Unlike Facebook, with native, you can double or triple your campaign daily budget without risking screwing things up.
***
Here are some additional details for the most curious ones on how I came up with the above optimization rules.
Optimization Logic and Auto-Optimization Rules
My best bet to come up with the right optimization strategy and rules was to look at my campaign stats. Having the cost, pending + confirmed conversion and revenue (excluding the current and previous day) in TheOptimizer, I just had to select a date range with enough data available to go over the stats.
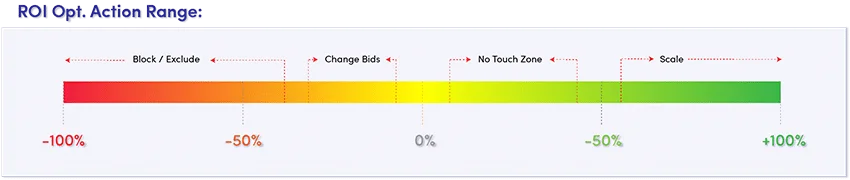
Even though I had a rough idea of how I was going to break down performance levels and optimization actions (see graph below), I still wanted to make sure I was in the right direction.
Using column filters on TheOptimizer I was able to quickly verify my optimization approach and adopt it to the above logic.

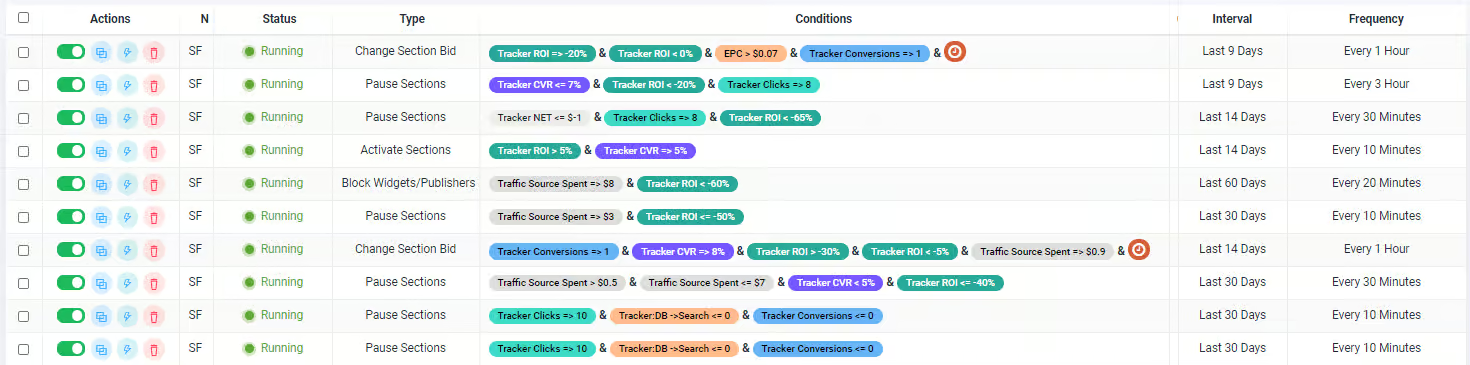
Publisher level rules:
As you can see from the rules list my main optimization focus was on the Section level. For Publishers, I had a pretty simple rule that was taking care of the budget-wasting publishers, just in case they were going to result in less than -60% ROI.
Important note: Because Sections are part of the main Publisher, I didn’t want to risk blocking any potential publisher that could’ve had over 50% of the sections in positive ROI.
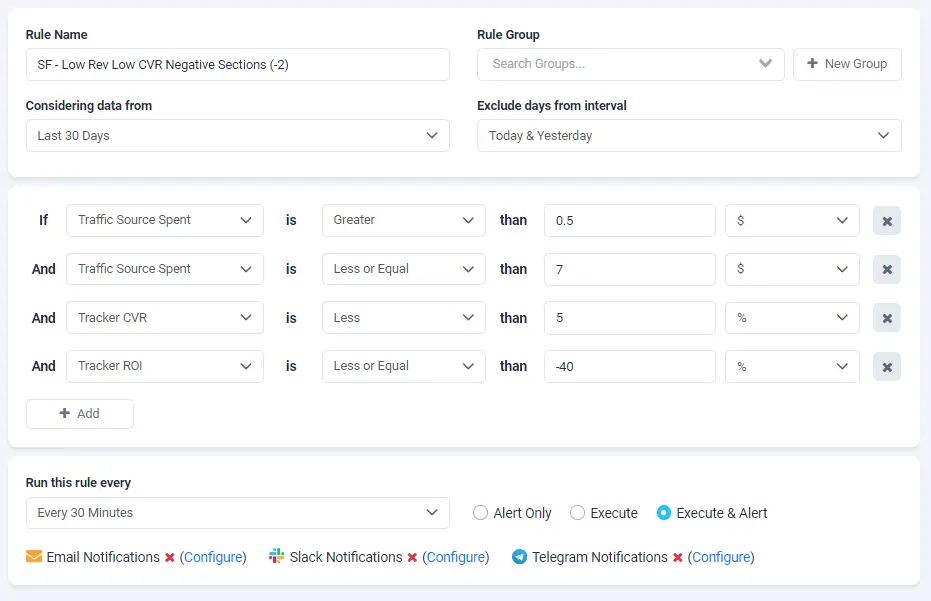
Section level rules:
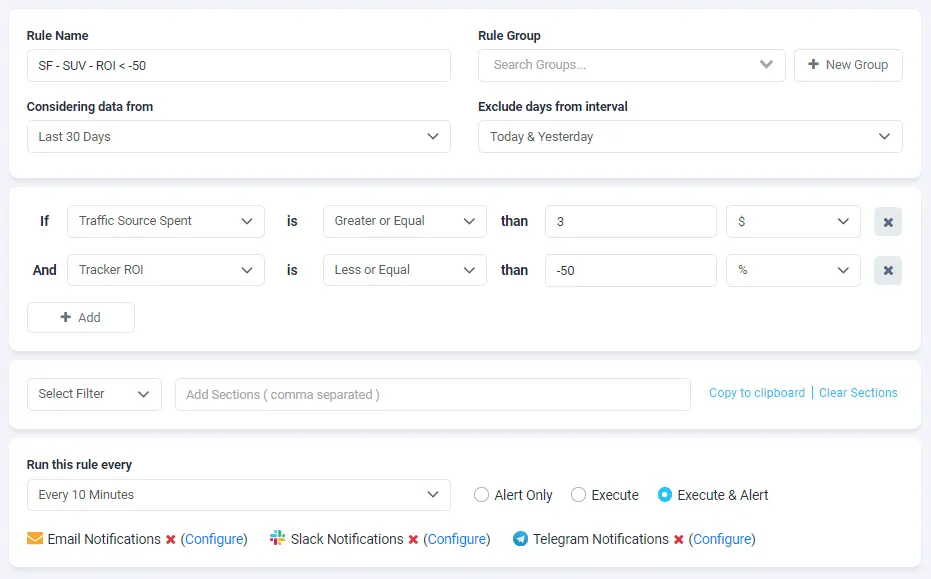
Here is where I applied the logic visualized in the above graph. I was practically cutting anything that had a low CVR and ROI worse than -50%, while tweaking bids for when the ROI was from -30% to 0.
You may say that there’s a gap between the two ranges, but because I could never know what the conversion payout might be for an additional conversion, I thought it was best to risk it and not over-complicate my approach.
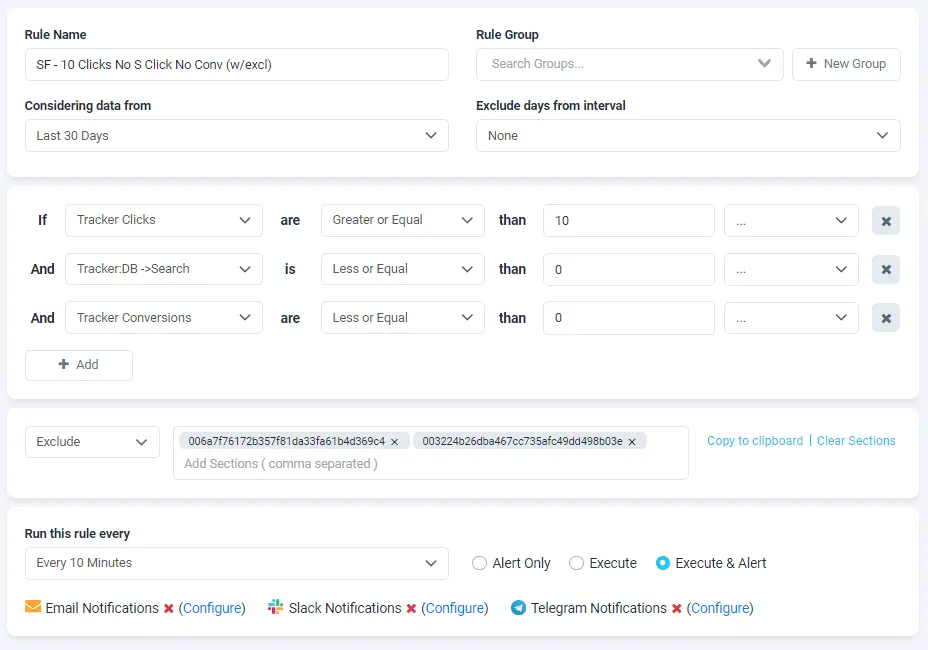
These two rules are identical in the condition settings, however, one of them is selectively excluding sections from the block actions. These are sections that have shown good results and I wanted to give them a bit more clicks to express their potential.
These two other block section rules were taking care of sections that were excluded from the aggressive section blocking rule providing full coverage on the thresholds I had determined from analyzing the stats.
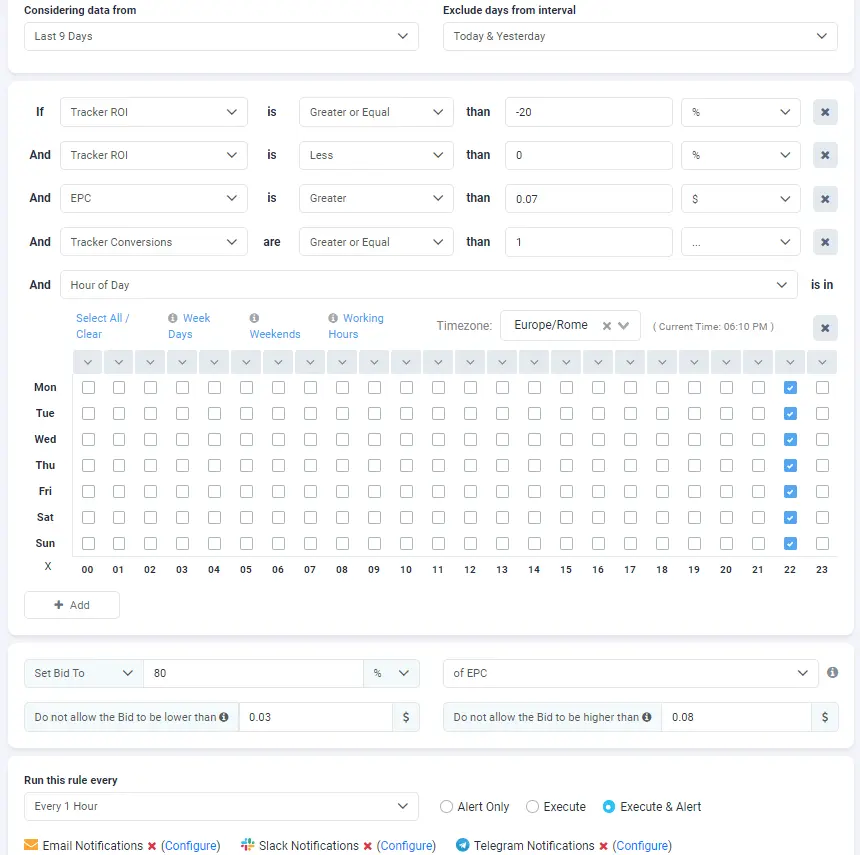

For sections that had an ROI between -20% to 0%, I was updating bids every day at 10PM CET (an hour I was sure the previous day’s revenue was updated). Then for sections that had an ROI between -30% to -5% and a CVR greater than 8% above $0.9 I was changing bids every 2 days based on the last 2 weeks’ performance. This way I was able to adopt bids to my Avg. EPC in a wider date range.
Along with the above rules, I had another simple rule to Unblock Profitable sections. This way I could easily turn on any potentially profitable sections that would have been previously blocked for missing conversions and revenue.
The Scaling Process
For this type of campaign, the scaling process isn’t necessarily vertical. Meaning that you shift the daily budget from $50 to $200. Even though the risks of having the campaign screwed up by this change isn’t present, it is still best to distribute the spend into multiple campaigns – scale horizontally.
Doing such a horizontal scale gives you more chances of finding a better match between your “campaigns + ads” and the traffic source optimization algorithm. It rarely can happen that two or more identical campaigns end up competing with each other – you would need to have 50+ identical camps to risk that.
Also, the original campaign that started targeting all devices in one place, was then split to specific device targeting per cloned campaign Desktop, Tablet, and Smartphone.
One extra tip I can give at the end of this case study is that you can easily replicate the same logic on virtually every campaign type – just run the numbers!